
Temprecord Ice point check
Setup instructions
Temprecord Ice point check is a quick and convenient way to spot check the accuracy of your temperature measuring instruments to an accuracy of ±0.01ºC at 0.00ºC or ±0.018ºF at 32ºF.
The ice point test is also a good method for monitoring any trends or developing problems such as temperature drift in your temperature measuring instruments.
If these problems are present they will be highlighted when you carry out an ice point check to a monthly timetable and keep a history of the results.
A comparison between the latest set of temperature results to the previous month’s results will provide you with a figure you can use to analyze if temperature drift is affecting your temperature measuring device.
You will need the test results from at least three to four months of testing before you can conclusivly confirm that your temperature measuring device is losing accuracy due to temperature drift.
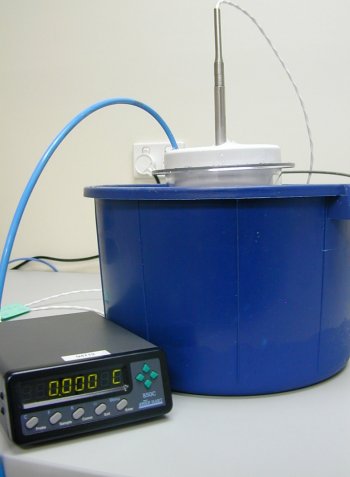
Equipment
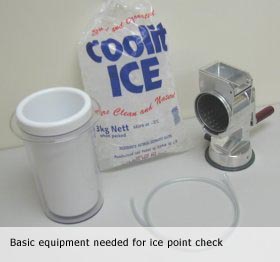
- A medium sized plastic bucket approximately 255mm or 10″ high that will hold the ice mixture during the test.
- One plastic siphon tube approximately 1 meter or 3 ½ feet long.
- One standard sized bag of commercially manufactured ice about 3kg in weight.
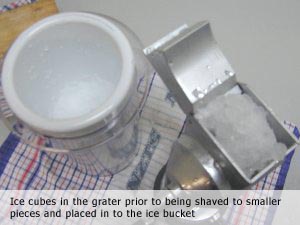
Ice from a local service station will be ok for this test. - A kitchen food processor with an ice shaving blade or a similar utensil to shave the ice into tiny 1mm sized chips.
- Setup your Temprecord loggers to take a temperature sample once every ten seconds, along with a short start delay period say 20 seconds, also enable the Start with and Stop with button feature so the loggers can be started and stopped away from the computer.
Method
- Fill the shaved ice container with one third cold water.
- Shave the ice using your food processor or grater down to very small 1mm-sized pieces
- Tightly pack the shaved ice into the ice container.
- Keep adding and compressing the shaved ice until the container is full to the top with the tightly packed ice.
Important note: Keep the maximum size of the shaved ice pieces to 1mm long..
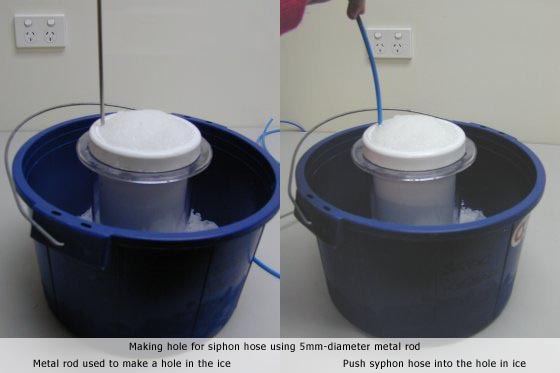
- Use a small diameter metal rod to poke a hole in the ice near the side of the bucket, and then place the siphon tube into the hole making sure the end of the tube is at the bottom of the container.
- During the test use the siphon hose to drain off any water from the bottom of the ice container.
- Regularly check for water in the container and siphon it away.
- Use the metal rod again to poke a hole part way down the middle of the ice equal to the depth of the probe.
- Stay at least 50mm or 2″ off the bottom of the container, then place your Temprecord logger probe into the hole in the ice and pack the surrounding ice firmly around the Temprecord probe.
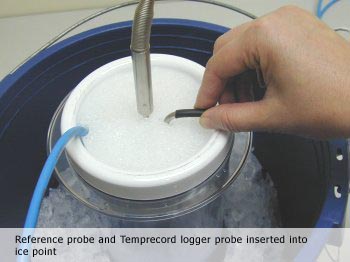
If you have access to a calibrated reference thermometer place the probe from this unit next to the Temprecord probe in the ice mixture.
Record the time and a reading from the reference thermometer every minute during the test, or more often if you prefer.
You can compare this data against what you download from the logger at the end of the test.
Doing this will give you an idea how accurate your logger is when compared to the calibrated reference PRT.
Avoiding Temperature Errors
A basic rule of thumb to avoid errors caused from stem effect is to insert the probe to a depth at least ten times the stem diameter of the probe that will be tested.
Example
The stem diameter of a Temprecord probe is 5mm so 10 x 5mm = 50mm or ( 2″ ) minimum insert depth.
Insert the probe further into the ice if you can, remembering to keep at least 50mm or 2″ off the bottom of the ice container.
If the ice appears to have a frosty or opaque layer on it pour cold water over the ice until it becomes clear in appearance.
Then compress the ice firmly after adding the water, when the water has reached the bottom of the container siphon it off don’t leave the water in the container during the test, water in the container will affect the results.
It is important that you do this as accurate results depend on these steps being closely followed.
Let the shaved ice mixture stand for about 15 to 20 minutes to allow the mixture to reach a constant temperature throughout before starting any testing.
After the settling time has passed start the logger and let it run for 5 to 10 minutes for probe loggers or 35 to 40 minutes for non probe loggers.
When enough sampling time has elapsed stop the logger and download the data from the logger.
The displayed temperature should be very close to 0.00ºC or 32ºF if everything has gone to plan, and if your logger is still recording temperature to the quoted accuracy level.
After a few hours the ice will start to melt so regularly check for and siphon away any water left behind from the melting ice.
Replace any melted ice using new ice and remember to compress the mixture to maintain the original height and consistency of the ice point check.
If the temperature from your logger is reading higher than 0.00ºC or 32ºF check that there is no water present in the ice container.
If any water in the container is up at the level of the temperature sensor in the probe under test the probe will read the temperature of the ice in this region as been fractionally warmer than 0.00ºC or 32ºF.
You do not want this to happen so siphon away any water in the container and re-test the logger, you should see an improvement in the accuracy of the logger after this has been done.
Important note: The ice point test described above is a quick and easy accuracy check at 0.00ºC or 32ºF only. If you have any doubts or concerns about the accuracy of the temperature-measuring instrument you are using we recommended that you enlist the services of an ISO17025 accredited calibration laboratory that uses traceable standards to certify the accuracy of your temperature-measuring instrument.